I am writing this blog because I didn’t see any good blogs or articles while I was working to implement GitHub Oauth with JWT based Authentication in an Open-Source contribution at AnitaB.org Open Source. I hope you will like this blog.
JWT (JSON Web Token) is an open, industry-standard RFC 7519 method for representing claims securely between two parties. It is a more secure and better way of authentication and authorization. You can read more about this here.
Installing Dependencies - Django
As this tutorial is about social auth I am not going to explain how to set-up a Django project. You can refer Django docs for creating your Django app.
This is the most important point which other articles do not cover:
If you are using djangorestframework-simplejwt in your project then you have to install dj-rest-auth and if you are using djangorestframework-jwt in your project then you have to install django-rest-auth.
Run these commands to install additional dependencies:
pip install django-allauth
# Use the below commands if your project uses djangorestframework-simplejwt.
pip install djangorestframework-simplejwt
pip install dj-rest-auth
# If django-rest-framework-jwt is used then use below commands.
pip install djangorestframework-jwt
pip install django-rest-authNote: djangorestframework-jwt is no longer maintained so I will suggest using djangorestframework-simplejwt.
You can read docs of django-allauth, djangorestframework-simplejwt, dj-rest-auth, djangorestframework-jwt and django-rest-auth for more information.
In this article, we are going to discuss the JWT authentication based on djangorestframework-simplejwt. For djangorestframework-jwt the implementation process is same but you have to use django-rest-auth instead of dj-rest-auth according to the docs.
Configure Django Settings
For using social authentication with REST API we have to change settings.py.
The suggested changes or additions are mentioned below:
INSTALLED_APPS = [
    # Django and Rest Framework
    "django.contrib.admin",
    "django.contrib.auth",
    "django.contrib.contenttypes",
    "django.contrib.sessions",
    "django.contrib.messages",
    "django.contrib.staticfiles",
    "rest_framework",
    "corsheaders"

    # For Social Authentications
    "dj_rest_auth",
    "django.contrib.sites",
    "allauth",
    "allauth.account",
    "allauth.socialaccount",
    "allauth.socialaccount.providers.google",
    "allauth.socialaccount.providers.facebook",
    "allauth.socialaccount.providers.twitter",
    "allauth.socialaccount.providers.github",

    # Add your apps here
]

SITE_ID = 2

REST_FRAMEWORK = {
    "DEFAULT_PERMISSION_CLASSES": ["rest_framework.permissions.IsAuthenticated"],
    "DEFAULT_AUTHENTICATION_CLASSES": (
        "dj_rest_auth.jwt_auth.JWTCookieAuthentication",
        "rest_framework.authentication.SessionAuthentication",
        "rest_framework_simplejwt.authentication.JWTAuthentication",
    ),
}

REST_USE_JWT = True

SIMPLE_JWT = {
    "ACCESS_TOKEN_LIFETIME": timedelta(days=2),
    "REFRESH_TOKEN_LIFETIME": timedelta(days=30),
}

ACCOUNT_EMAIL_VERIFICATION = "none"Note: REST_USE_JWT = True is required for using JWT authorization in Social Authentications.
Django Views
Django all-auth provides adapters for social auth. So we have to import these adapters. To know more about adapters read this.
Both dj-rest-auth and django-rest-auth have SocialLoginView which can be used to retrieve the token from social authentication.
Code to implement different REST API auth views is mentioned below:
from allauth.socialaccount.providers.github.views import GitHubOAuth2Adapter
from allauth.socialaccount.providers.google.views import GoogleOAuth2Adapter
from allauth.socialaccount.providers.facebook.views import FacebookOAuth2Adapter
from allauth.socialaccount.providers.twitter.views import TwitterOAuthAdapter
from allauth.socialaccount.providers.oauth2.client import OAuth2Client
from dj_rest_auth.social_serializers import TwitterLoginSerializer
from dj_rest_auth.registration.views import SocialLoginView
from django.conf import settings


class GithubLogin(SocialLoginView):
    authentication_classes = []
    adapter_class = GitHubOAuth2Adapter
    callback_url = # <Your GitHub Callback URL>
    client_class = OAuth2Client

class FacebookLogin(SocialLoginView):
    authentication_classes = []
    adapter_class = FacebookOAuth2Adapter

class GoogleLogin(SocialLoginView):
    authentication_classes = []
    adapter_class = GoogleOAuth2Adapter

class TwitterLogin(SocialLoginView):
    authentication_classes = []
    serializer_class = TwitterLoginSerializer
    adapter_class = TwitterOAuthAdapter
Django URL’s
Add the defined views to serve to a particular url. The code to implement this is:
urlpatterns += [
    ...,
    path('twitter/', TwitterLogin.as_view(), name='twitter_login'),
    path('google/', GoogleLogin.as_view(), name='google_login'),
    path('facebook/', FacebookLogin.as_view(), name='twitter_login'),
    path('github/', GithubLogin.as_view(), name='twitter_login')
]
Final Setup
Now you can migrate by running this command: python manage.py migrate.
Create a superuser using python manage.py createsuperuser command and login into the Django admin site (http://localhost:8000/admin/). Navigate to the site model dashboard and add site i.e for development add localhost:8000 to the domain name and enter any value in the display name. You can refer the below image for more description:
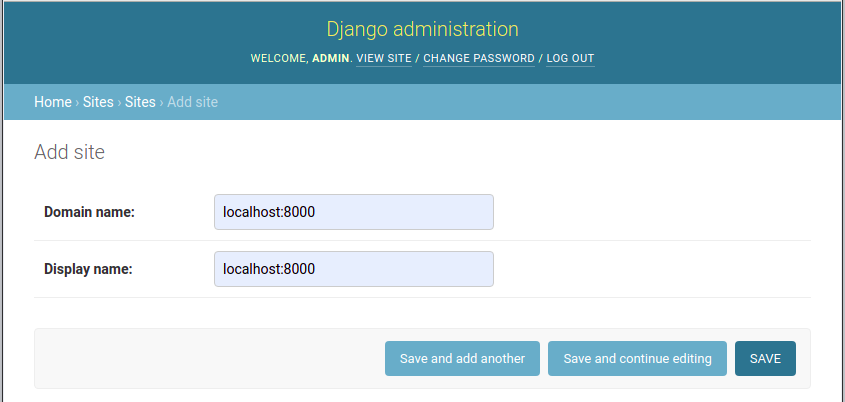
After saving this click on the object that you have created i.e. localhost:8000 and in the URL see whether the site_id is 2 or not. If it’s not two then change the site_id in settings.py to the observed value.
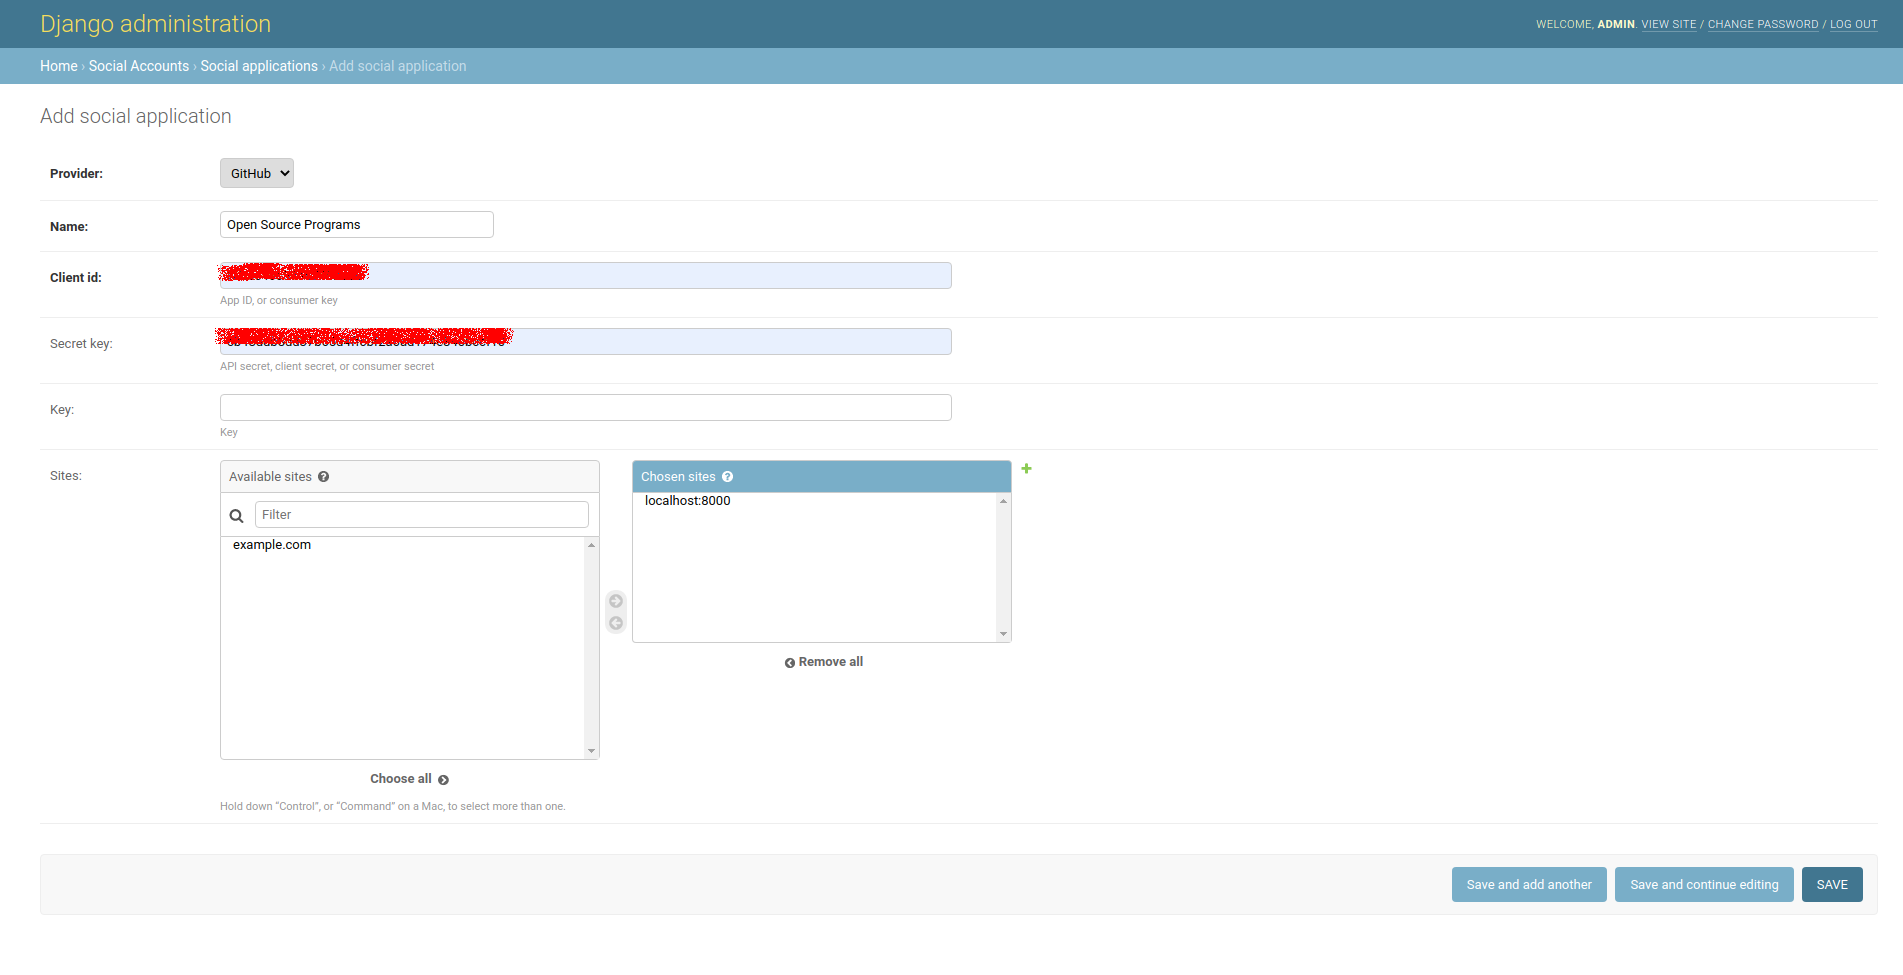
After this step, the only step remaining is to add social applications. For this visit the social applications page on the admin site and add the configuration like client id and secret key inside this form and save the application. I have included the image for GitHub below but others are also the same.
For getting the credentials for adding social login you can follow the docs of providers.
Now all the process for backend is done and after this, you have to use the URL defined in the above steps to get the access_token by making a POST request from the frontend.
Image of GitHub Login View in drf:

React - Frontend
In your React app, you have to call the API and use the retrieved access token to log in users.
You can make components of different login by following this for Google login, Facebook login, GitHub login, and Twitter login.
After this, the only thing remaining is to call the API and get the access token. For this, you may need axios library.
Use axios to call the API that we have made in previous steps and store the access token to make user log in to the frontend.
For code to implement this in React (frontend) you can refer this.
Thanks for reading this. I will post more content regarding this in the future.